Lesson 2: Roland GS-24

General Info about Roland GS-24
The Roland DG CAMM-1 GS-24 is a very precise desktop cutter that offers great stability, up to 10x overlap cutting and down force of up to 350 grams so that you can cut thick material up to 1 mm. thickness.
Due to prise and effective cutting, it’s possible to run the machine for 5 times on a pattern to get job done if the material is not very soft.
You can find more specification here.
Let’s learn how to load material and set the machine for proper cutting.
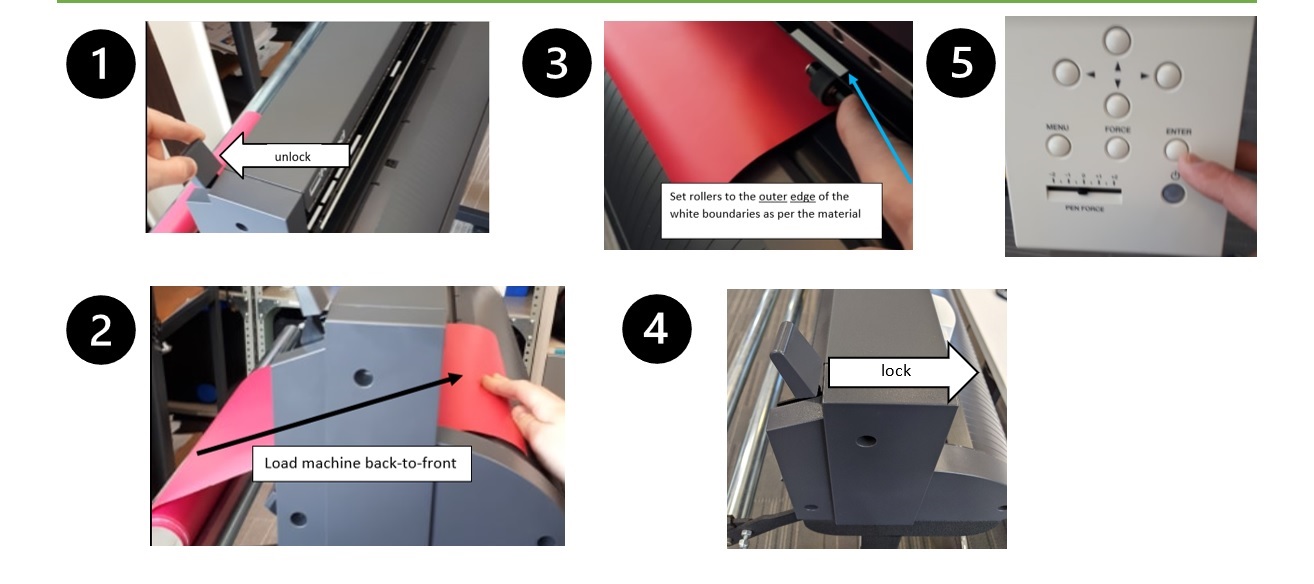
Part 1 – Loading material
- Unlock the lever.
- Load your material into the Roland, moving from back-to-front.
- Place the wheels on either edge of your material AND underneath any of the white guide mark.
- When complete, use the lever to lock wheels and material in place.
- After your material is secured, you can use the arrows on the machine to move the material forward/backward without re-loading.
Origin – If the blade is too close to the material edge, press the down arow to move the material forward. Then press and hold ORIGIN button on the Roland to re-set the starting point of your design.
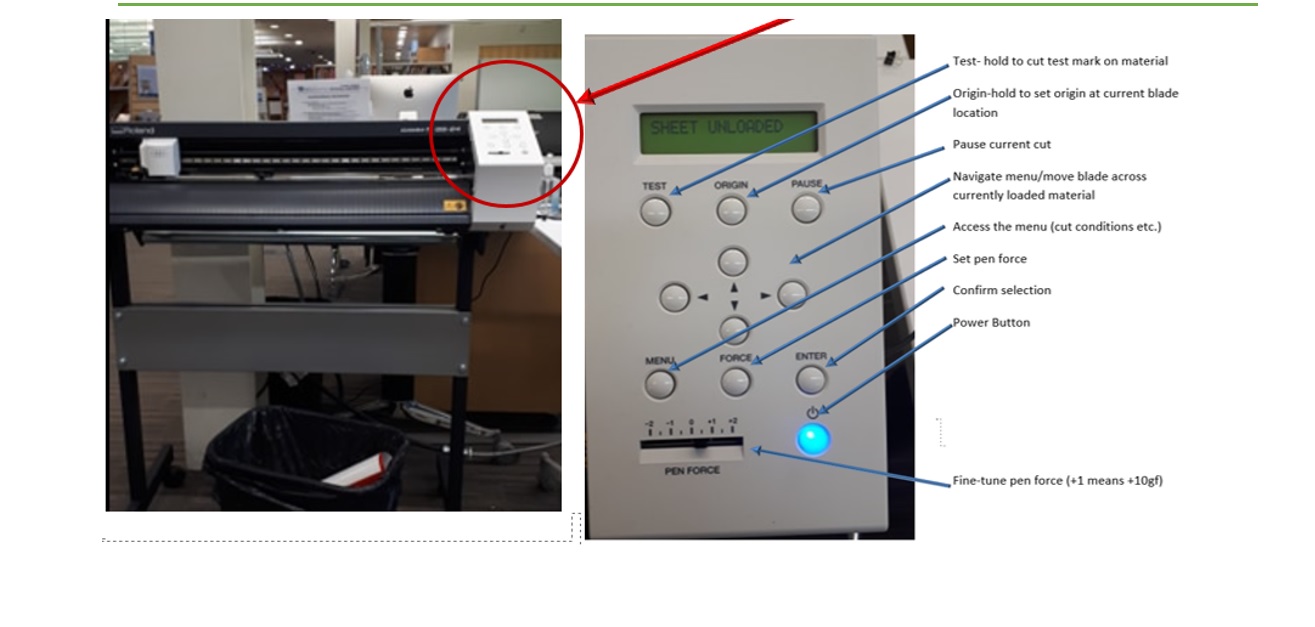
Part 2 – Using Roland Control Panel to input settings
After you load your material, the Control Panel is used to set parameters of each cut. It has many features. Most designs require you to set only 3 main options:
- Material
- Force (gf)
- Speed (cm/s)
·
2.1 MATERIAL:
After you lock your material in place, Roland will prompt you to select MATERIAL.
- Press the down arrows on the machine to choose between ROLL, EDGE, or PIECE.
- Hit ENTER to make your selection.
2.2 FORCE:
To adjust the force, select the FORCE button on the Roland head.
- Use the left/right arrows on the machine to increase/decrease the force as needed. The value changes in increments of 10 gf.
- To fine tune your selection, use the slider. Each notch adds or subtracts 5 gf from the cut.
- Hit ENTER to make your selection.
2.3 SPEED:
To adjust speed settings using the control panel.
- Select MENU.
- Press the down arrow until you see CONDITIONS.
- Select right arrow to enter the conditions sub-menu.
- Select down arrow again until you see SPEED.
- Select right arrow to enter the SPEED sub-menu.
- Adjust the speed using the up and down arrow
- Hit ENTER to make your selection.
Best Practices
Cutting Mat
Always use a cutting mat to load cardstock, paper or any material that does not have a backing.Roll vs Edge vs Piece: What’s the difference?
For ROLL or EDGE, the machine will measure the distance between the wheels to obtain width and assume you know the length. If you select PIECE, the machine will measure width and length by moving the material forward until it detects the end.Control Panel vs. CutStudio
MATERIAL type must be set using the control panel. FORCE and SPEED can be set either using the machine or directly in Roland’s CutStudio software.See bottom of this page for suggested settings.
Material Guide:
Below lists the optimal blade settings by application. These are general guidelines only and it is always recommended to send a cut test before sending any jobs.
NOTE * Glitter cardstock/Coverstock should be loaded face up (glitter up) onto a cutting mat.
| Material | Cutting Force (recommended) | Cutting Speed |
| Glossy Vinyl | 70-110 gf | 30 cm/s |
| Matter Vinyl | 75-85 gf | 15-35 cm/s |
| Cardstock | 80-90 gf | 10-20 cm/s |
| Coverstock | 145-160 gf | 20 cm/s |
| Smooth Heat Transfer Vinyl | 65-75 gf | 20-30 cm/s |
| Glitter Heat Transfer Vinyl | 110-130 gf | 20-30 cm/s |
| Magnetic Vinyl | 150-600 gf | 5-10 cm/s |
| Glitter Cardstock * | 160-180 gf | 20 cm/s |
| Glitter Coverstock * | 180-200 gf | 20 cm/s |
| Vinyl <3 millimetres | 70-90 gf | 30 cm/s |
| Vinyl >3 millimetres | 90-300 gf | 25 cm/s |